
The Windows 10 "GodMode" tool is a hidden feature that provides quick access to all settings and options available in the Control Panel.
Here are a few reasons why you might want to use this tool:
Convenience and Efficiency: The GodMode tool allows you to have all the settings and options in one place, eliminating the need to navigate through multiple menus and windows. It can save you time by providing quicker access to specific settings.
Easy Troubleshooting: If you're facing a problem with a specific feature or setting, the GodMode tool allows you to quickly locate and modify those settings, potentially resolving the issue more efficiently.
In-Depth Personalization: By having access to all settings and options, you can customize your Windows 10 experience according to your preferences. Whether you want to tweak the appearance, security, or system settings, the GodMode tool provides a centralized location to quickly make changes.
Learning Tool: Exploring the numerous settings and options available through the GodMode tool can be a valuable learning experience. You can discover features you may not have known existed or gain a deeper understanding of various settings within Windows 10.
Remember, the GodMode tool is not an official feature, and using it requires some technical knowledge. It is always recommended to proceed with caution and make changes only if you understand their implications.
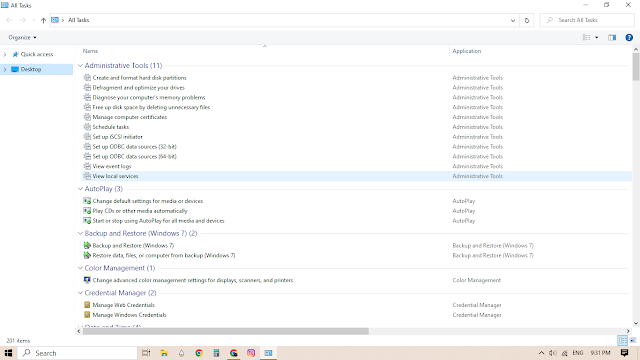
If you prefer using the classic Control Panel in Windows 10, you can add the "All Tasks" applet, also known as God Mode, to it. This applet provides a single view of all Control Panel items, making it more convenient to access various settings and options.
How to Add All Tasks to Control Panel in Windows 10 (the God Mode folder).
Here's how you can add it to your Control Panel:

- Press the Win + R shortcut keys together on your keyboard to open the Run box.
- In the Run box, type the following command and press Enter:
shell:::{ED7BA470-8E54-465E-825C-99712043E01C}.
Note: In this version of Windows, Microsoft is transitioning from the classic Control Panel to the Modern app called "Settings". However, the classic Control Panel still provides access to additional options and features.
To add the All Tasks applet to the Control Panel, you can use a Registry tweak. Here's how:
- Download the ZIP archive containing the Registry files from this link: Download Registry Files.
- Extract the downloaded files to any folder on your computer, such as the Desktop.
- Close the Control Panel if it is open.
- Double-click the file "Add All Tasks To Control Panel.reg" and confirm the operation. This will add the All Tasks applet to your Control Panel.
Now, when you open the Control Panel, you will see the All Tasks option under the System and Security section. It will be visible in both the "Large icons" and "Small icons" view.
To remove the All Tasks applet from the Control Panel, you can use the included undo tweak. Here's how:
- Locate the file "Remove All Tasks From Control Panel.reg" in the folder where you extracted the Registry files.
- Double-click the file and confirm the operation.
This will remove the All Tasks applet from your Control Panel.
If you like this article, please share it using the buttons below. It won't take a lot from you, but it will help us grow. Thanks for your support!
%20(1000%C2%A0%C3%97%C2%A0800%C2%A0px).jpg)


![Adobe Photoshop CC 2020 21.0.0.37 Windows + macOS [Full Version]](https://blogger.googleusercontent.com/img/b/R29vZ2xl/AVvXsEiDQ5AKBvnXu-YZLVekTEr-zvs2ndl33nWq-5Lw-nwhhnDTvyQDbzKD8JKUiywn1XKZrI-4D7Uj0EBPstLmqYEyot2IzrScWnUpKh54ThNdJ5Lda7F2GAjes5rOKxOvYMLajQWXHVNQulAr/w72-h72-p-k-no-nu/Photoshop.jpg)
![KMSPICO V.11.2 – ALL IN ONE [WINDOWS & OFFICE] ACTIVATOR](https://blogger.googleusercontent.com/img/b/R29vZ2xl/AVvXsEhK1j6GDstPWYeffpoPMylCuvjzvSOF-LhgDqNcGXRQ6wkV9_PCD_xTIwdeQRjxJj7tZBT1rngWXX8J19zJAB2z8I436siV7Pi4C6BO4Pl_PS-JConvn-j_DESuiHFis7rR-5uoYOoqtNcnjWNhdMt2JCSSlWBi4bajJlrHuGmTLvO7iPqMsYuz-ppy/w72-h72-p-k-no-nu/E1YvxqGUcAAYJpk.jpg)


0 Comments